Showing posts with label craft [home]. Show all posts

Wednesday, May 22, 2013

Alex's Quilts {Part 1}

While his grandma requested an "all Alex all the time" blog, and while I take about a dozen photos of him per day, I'm going to show some restraint and just sprinkle him in among or regular posts. For example, your Alex shot of the day ::


He's laying on the amazing transportation quilt my mom made for him. Just like Monday's cradle post, I'm sure my photos aren't doing this quilt justice {and don't let my mom try to point out the silly flaws she may see}. Each of the nine squares shows a different vehicle {Little A is covering a tractor, submarine, sailboat, and school bus}. I think my favorite is the tractor ::


How perfect are the fabric choices for that square? From the batiked tractor body to the paisley field to the smiling sun.

I really love the little details in each square. Check out the mustache and bow tie on the cyclist below and the little yellow fish with big red lips swimming with the sub.


And yes, there are more awesome quilts to come!

Monday, May 20, 2013

Alex's Cradle

My pop made a beautiful cradle for Alex {he gets to sleep in it during those rare occasions when we're willing to put him down!}.


I don't have the original source for Pin that inspired this cradle, but the execution was all Pop's. He cut and bent the sides making a little boat for Alex to dream in, and cut little anchors out of the rockers ::


The cradle is truly a work of art {I know my sub-par photos are not doing it justice}, and it's going to be so much fun to see it passed from grandchild to grandchild and photographed through the years as our family grows! Speaking of growing, on the left is Alex the day we brought him home from the hospital and on the right is a photo taken just yesterday ::


I'm really going to make an effort to get back to some regular blogging. We've had quite a few family visits, and we've been doing a whole lot of this ::


Which leads to silly photos like this ::


And this ::


But I can't wait to post some garden updates, and there are a few more handmade gifts to share!

Tuesday, March 26, 2013

Spring Wreath

Ugh, somehow a few unexpected deadlines and some crazy moments in the classroom are making my work life extra hectic just when I want it to mellow out. The deadlines meant working through the weekend rather than sewing up some baby pants or bib cloths, but I know we'll survive just fine without either {since we don't have a baby yet!}.

Then there are the days upon days of fresh snow in the middle of March, which are not helping to put a spring in our step.

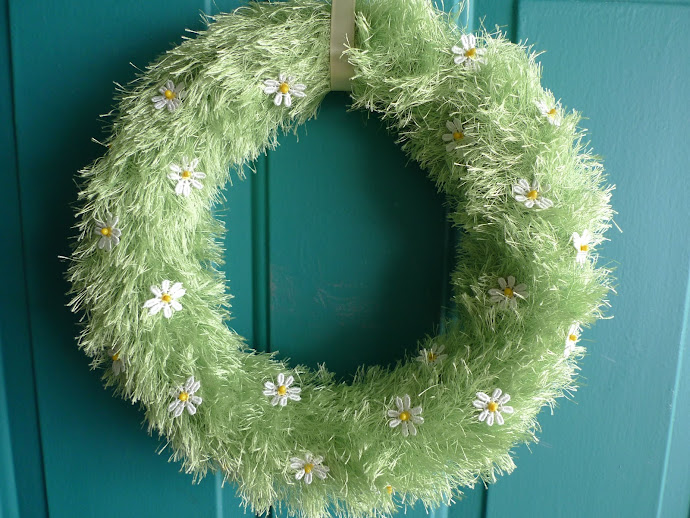
So in defiance of both the snow and the work-filled days, I took a little time out on Sunday night to put together this spring wreath::


The idea came from Pinterest, and one of these days I'll track down and credit the original source {here it is!}. Really, it couldn't be easier to put together. Just grab a styrofoam wreath form, wrap it in green fun fur yarn for the grass, cut apart some daisy chain ribbon, and stick them to your wreath using straight pins.


A quick spring wreath just in time for our Easter guests!

Tuesday, February 19, 2013

Heart Pillow Squared


It didn't take much to finish up the heart pillow. Just a half yard of cream corduroy that I used to back the coffee sack ~ I thought this would be useful for a couple of reasons: to provide a solid backing for the slightly loose weave of the coffee sack and by sewing the sack to the its backing, I was able to reinforce the edges so that the sack couldn't fray and come undone at the seams. I then used the corduroy to make an envelope back for the pillow.

So in the florescent light of the sewing room on Sunday night, I had a little pillow sandwich that looked something like this::


That's the corduroy backing for the front, the front of the pillow, and the two back panels.

... and look who's here to crash the party again!


Thursday, February 14, 2013

Happy Valentine's Day!

I had fun stitching this heart onto an old coffee sack, and have grand plans of turning it into a pillow this weekend! xoxo

Tuesday, February 12, 2013

And the Moths Won

Ack. I knew there was a problem.

I would open the coat closet door, shuffle around to find something, and a moth would flutter up.

I would open the craft closet door with a rush, and poof, another moth.

I may have dealt with the problem by killing any moths I saw, tossing in a few cedar blocks, closing the closet doors and crossing my fingers.

I realized a couple of weeks ago that it was time to finally tackle the moths head-on. We keep the wintry wools {hats, mittens, scarves} in a basket in the coat closet. I cleaned out the basket, washed the accessories and took stock of what survived. These mittens, for example ::

They didn't make the cut, and they're possibly the biggest loss of the bunch. I'm not a big mitten wearer, but that pair was perfect :: tightly knit to keep out the cold, not too thick making it easy to hold bags or dog leashes while wearing, and they were fun to look at.

Other than the mittens, we ended up with quite a few holes in some hats, most of which I think I can easily mend. And a few that I'm even excited to mend because adding a touch of color will make them more exciting.

The wool in the craft room didn't fare much better. There were skeins of natural fibers covered in moth eggs ::

With some of those, it was easy to pull off the damaged outter layers and salvage a portion of the ball. Others weren't worth saving.

Then there were the unfinished projects, like my Vivian sweater {those are holes in the beautifully-cabled hood}::
It always seemed a touch small, and so it was just sitting in the closet waiting for a zipper and/or for me to unravel it and start again.

Of course it's a bummer to lose the yarn, but I have to admit that there was something freeing about being able to just toss the Vivian sweater in the trash and not have it hanging over my shoulder. Now I can open the craft room closet doors to a smaller selection of uber-organized yarn just waiting to be knit. I'm just crying over my holey mittens.

And going forward, we've become moth-repelling experts. Trying to stay away from the toxins in mothballs, cedarwood oil has become our weapon of choice. The difference between the two methods is that the cedar oil kills the moth larvae, while moth balls are able to knock out the moths and the larvae. But a word of caution ~ you should always be careful when using highly concentrated essentials oils because they can be toxic too {in this case, it's recommended that pregnant women use caution around cedarwood oil, and so I've had Sarah step up and do all of the dirty work for me right now}.


First we thoroughly cleaned the closets as well as the infested garments and yarns. We freshened up the cedar blocks with some fresh oil. The yarns were sorted and stored in sealed plastic bags {keeping the zippered bags that sheets and comforters are sold in comes in handing for sorting and storing in these instances}. And finally, we applied the cedar oil to a few alternate surfaces, such as the inside of the basket holding our hats and mittens as well as some wooden crates that I keep in the craft room closet.

Monday, February 11, 2013

Earring Holder :: Take Two

Even though my mom and C keep me stocked with beautiful/fun/awesome earrings, I can wear the same simple studs for weeks. It happens when all of those pretty earrings are tucked safely away and out of sight in jewelry boxes.

The fix to this problem was even easier than expected :: I picked up a smallish frame from Michael's and popped in a piece of radiator cover I had left-over from making these as gifts last year.

To simplify the process, I cut the radiator cover so that it just fit inside the frame ~ it was so snug that once in the frame it doesn't move and I didn't have to bring out the powerful/smelly glues to do the dirty work. I also skipped the finishing step where I glued the nylon rope around the back side to give it a clean finish. Without that work, this project took all of five minutes.

It's been hanging next to our big mirror and above my necklaces for a couple of weeks now, and I'm happy to report that I switch out earrings 3 to 4 times a week!


Monday, January 28, 2013

Christmas Gifts :: The Knitted and Crocheted


I had the best of intentions to make a couple of sweaters, but those plans were crushed by my fall travels. Instead, I finish some accessories for all of the ladies in our families :: knitted goods for the ladies on my side and a new, crocheted project for the ladies on C's side.

Kris received a bulky hat with a touch of those bright colors that she loves. This was a made-up pattern from start to finish using Bernat roving and left over bits of wool brought back from Germany for a hat souvenir, which it looks like I never shared in its finished pom-pomed state.


Sarah gave a not-so-subtle hint that she wanted a replica of my blue mobius cowl.Not only was I able to fulfill her request, but thanks to the organization that Ravelry provides, I was able to order the exact same wool for the project... now we'll never know whose is whose.

Mom had request a lacy, slouchy hat, so I knit up this creation for her. It's a pattern I've been working on and have the best of intentions of sharing... soon.


After seeing this crochet-edged scarf, I knew I wanted to try my hand at one and thought they would make good gifts for C's mom and sister.

I have to admit, I didn't sign up for the class, but decided that I would figure out some version on my own. I used one of my favorite large scarves as a template for size ~ making this a big square of cotton fabric. After hemming the fabric on all sides, I went around the edge and made a blanket stitch, that was followed by a foundation round of single crochet stitches, and finally, I went around one more time adding the scalloped edging as follows: make one single crochet into the first foundation stitch (single crochet) from the previous round, *skip two foundation stitches, then double crochet 5 stitches into the next foundation stitch, skip two foundation stitches, then single crochet into the next foundation stitch*. That creates one scallop stitch, repeat the directions between the stars {*} until you have made your way around the scarf.


After finishing and giving the scarves, I realized that their big squarish shape can make it a bit confusing ~ I thought they almost looked like a fancy table cloth rather than a scarf, and C's sister modeled her's as a cape...

Luckily, even with it's large size and the weighted crocheted boarder, the scarf was still flexible enough that it could be worn wrapped loosely {as I did above} or snuggly {see below} around one's neck.


Wednesday, January 23, 2013

Christmas Gifts :: For the Home

It was fun this year to be able to get into the craft room and create some smaller, simple gifts with materials I had stockpiled.

Sometime about two years ago, I picked up these smallish jars in a thrift shop. I didn't have an exact plan for them, and I knew that I didn't need them for anything, but at $2 a pop, they were hard to pass up.


Fast forward to this fall when I was oiling the cutting boards in my house and realized that some spool oil would be a nice little gift for my mom and sister ~ both bakers and makers with plenty of wooden spoons and boards.

One batch was the perfect amount to fill both jars, and it should keep them well supplied for a couple of years. I oil my boards and spoons about three or four times a year and still have plenty of stock from my original batch.

The other small, extra gifts that I tucked in packages this year were lavender sachets. The lavender came from our garden last June ~ I hung it to dry and then stored it away until I had a plan. These were whipped out in an afternoon in front of the sewing machine ~ just a simple rectangle with some lace for decoration and a loop for hanging. I then slipped them into gifts that were knitted or crocheted for our moms and sisters {more on those tomorrow!}.

Monday, May 14, 2012

WIP {rocking chair}

Last fall, a farm up the street was having a yard sale and I scored this rocking chair for $1! Of course, it didn't come with a seat and was in serious need of a paint job, but still, it was just a dollar! So I finagled it into my trunk, brought it home and painted it that night, and then it sat on the porch all winter as I tried to come up with a seat solution. At first I thought I would treat the frame like a loom and weave something colorful around it. Then I thought I would keep it simple, put any old seat on it and make a fun wool cover using some of the army blankets that ware used as picnic blankets at our wedding. And then as spring's porch-sitting weather approached, I realized it was now or never, and I decided to go with belts.


I wanted to be selective, and use only old, worn leather belts, but no matter how many times I visited our local Good Will, I couldn't find enough. I thought this would be a quick and easy project, but I was so surprised at how hard it is to find the belts! So I decided to go with a collection of leather, cotton, and jute. Of course, there's a stray fake-leather belt in the mix right now, and that's why I'm considering this a work in progress ~ I'm going to keep searching, and as I find used leather belts, I'm going to add them to the chair and remove others. {and I'm not above begging ~ have any old leather belts you want to send my way?!}

But for now, it's good {and comfy!} enough to support a whole evening of porch sitting and knitting...

Wednesday, April 18, 2012

Bedroom Art

First a confession :: most of last week month our bedroom looked like a tornado hit. Once we clean the place up, it looks too bare to me, but then I remember that this is what we were going for; a room that's quiet and calm, not full of clutter. Of course it will probably be covered in clothes and soon as the laundry's done, but for now I'll present the illusion of the clean, calm bedroom that we're enjoying this week.

I introduced you to our bedroom over a year ago, and since then I'm happy to say that it's come a long way! In that post, there was no art on the walls, broken handles on our dressers, no side tables, or plants, or curtains... In October I gave you a snapshot of the colors and textures we were adding to the room. Then came the curtain project. And now, FINALLY, with the addition of one more piece of homemade art, the room is done. So I'm going to drag us all through the bedroom one more time {since I have a record of the "before" on the blog, I thought it was worth it to do an "after" post}, and at the end you'll see our new art.

These flower knobs {picked up at Anthropology on sale} were added to the dressers::

Buying them was easy. Actually putting them on all the drawers took about 3 months because I needed a hacksaw to cut off the extra long screws so that they wouldn't catch on our clothes inside.

Above the bed we added the Mandal headboard from Ikea, which was made for our space::

I like how well it works with our Japanese-style bed, filling up some of that large, white wall. The headboard comes with six shelves, but we're just using three ~ two on my side because I hoard books and knitting by the bed {notice the basket under my shelves for the overflow of yarn}, and one on C's side for his phone, which is where he stores all of his books! The photos make it look like we've pushed the plant into the corner, but it's actually away from the walls by a couple of inches.

Above the bed is a photograph of the moon that my sister Sarah took while we were on vacation in Germany. She took the photograph from the window of a cute hotel in Garmisch, where they served the best German breakfasts, and the hotel owner would dote over his baby grandson. Garmisch is near Zugspitze, the highest peak in the country, so the day after arriving we took the cable car to the top and stared in awe at the scale of those mountains. While waiting for the cable car, I saw a knitted hat that was simply made, but different from my plain-jane hats ~ it was wide segments of stockinette and reverse stockinette in bright colors. There was a little yarn shop just two doors down from our hotel, so that evening Sarah and I stopped in and I picked up the yarn to knit the hat I'm wearing in this post. At this point in our trip we had driven hundreds of miles, visited a handful of cities and their Christmas markets, braved the exceptionally cold weather, and were exhausted yet happy. So when we got home I had the photo printed on canvas, and hung the moon over our bed.

From the bedroom door, you can see the taller dresser with its knobs, a little seating area, and the Matilda curtains::

 I modified the curtains by cutting off the hanging loops and replacing them with a panel of patterned fabric::
The curtain fabric matches the dresser knobs which also match our octopus pillows. I was going for the same, but different {or "same same" but different, as they say in Thailand}. What do you think? Good? or Make you want to throw up?

And now, the big reveal ::
We needed a large piece of artwork to hang over our low dresser. Unfortunately, we have those large, ugly air return vents on our wall, so rather than centering the art over our dresser, we have it hung to the right to cover the vents. I've thought about adding something tall to the left side of the dresser {reeds in a vase?} to balance things out, but since the layout isn't driving us crazy, I may just leave well enough alone rather than have to explain why we have a "vase of sticks" on the dresser.

For a few months, we had just had the blank piece of cotton fabric hanging on the wall while I thought about what should go there. I knew I wanted to keep it simple, preferably just using one or two colors on the fabric. Every once in a while I would toss out an idea to Calder. What about "word art"? Here's one example and another. He didn't love the idea and I couldn't think of something that I would absolutely want to read every day {although, I do have an idea for a piece of word art for our entryway}. Then one evening I drafted a few flower images and tossed them out for C's review. He really liked the queen anne's lace, which was great because I can't get enough of the flower myself! So I took down our blank canvas and got to work.

The icing on the cake? This large piece of art cost just $10! I picked up the fabric for $7 with the help of a Joann's coupon, and taking an idea from this post, I used a $3 bottle of shoe polish as the paint!

What do you think? I'm loving it and want to make more!

Monday, March 26, 2012

Weekend Update

This was our first weekend at home in three weeks, and I enjoyed every moment. Other than leaving the house to pick up supplies, we stayed in, cooked up a storm, did a bit of work, watched some movies, knit, ate, convinced the dog to sleep in late... good stuff.

 I worked on an experimental marmalade with these little guys. More details on the fruit and the marmalade soon::

Last week I felt like we were living in a food desert ~ every morning there was nothing quick and easy {& healthy} to grab for lunch, and every evening I was hoping that C had a better idea than me {oatmeal anyone?} for dinner. I decided to remedy that for the week ahead and took a bunch of macro photos as evidence.

 This jar of split peas turned into soup:: The soup was so simple. Sweat two sliced leeks and two sliced carrots in olive oil. Add your split peas and the appropriate amount of vegetable broth. Simmer on low for an hour or two, mixing every once in a while to help your peas turn into a mushy goodness.

 This cauliflower was roasted with some garlic and then blended with white beans for a tasty dip:: The recipe came in an issue of Everyday Food, but it can also be found here. The dip is a nice alternative to hummus. I ate it with pretzels and slices of bell pepper. BUT before the cauliflower became dip, I nibbled on the roasted bits and discovered my new favorite way to eat that veg.

 A whole pile of lima beans, some cucumbers, bell pepper, and a handful of mint became a salad:: I topped it with a vinaigrette made of brown sugar, balsamic vinegar, mustard, and olive oil. During the week, I'll eat it as a side at dinner, and add it to greens to make salads for lunch.

 Outside, the pansies we planted last fall are re-blooming in their hanging basket::

And a branch we cut off the cherry tree that was hanging a bit too low, giving me plenty of blossoms for a jar on the porch::

And finally, when the sun went down today I was back inside working on a new piece of art for the bedroom. As soon as we fold the clothes in there and put away the coffee pot {if only I were kidding}, I'll show you the final piece::

Wednesday, February 08, 2012

Hang up your coats!

Yep, it's hang-up #5.

We have a coat closet, but wanted and easy hook option for hanging coats and leashes when we walk in the door. This was a really simple project, you just need a nice piece of wood that's at least as wide as the studs in your wall and some hooks. Attaching the hooks to the wood provides the extra support you'll need to withstand the daily force of grabbing and hanging those heavy winter coats. The standard stud distance in US houses is 16 inches {this is not so in much of Europe ~ did you ever notice how you buy something from Ikea and its screw holes are either too wide or two narrow to hit two studs?} My pop cut and sanded a plank that was 36 inches long, giving us plenty of coverage for screwing into studs that are 32 inches apart.

Before screwing the hooks into the wood, I contemplated painting it, but C was in favor of the natural wood look ~ so I applied a coat of my favorite beeswax polish and called it a day. It gave the wood a nice, finished look, and it should add a bit of protection when we hang up wet coats.

But I have to be honest, after a few days on the wall, half of our coats still end up hanging over the backs of chairs... we're just leaving the hooks open for guests :-) The hooks all came from urban outfitters. The larger, acorn hooks are about seven years old and have hung in four different apartments as I moved through the years. The flowers are new ~ I picked them up on sale last week!